
Putting it all together
If you want to jump in and start building the NaV-1 Synthesizer, this is the place to start! If you would like to see the design process from the beginning go HERE.
If you have been following the NaV-1 project over the last several months, you have seen the design slowly come together and hopefully gained some insight into the design process. There have been changes and re-designs along the way. Now the hardware part of our project is complete and set in stone. So lets build a final version.
Buying the Soundgin / Babblebot chip
This is the only relatively hard to get component on this project. Therefore it should be the first thing you acquire. If you can't get your hands on one of these, this project is going nowhere fast. Please read this article about buying the chip. I have had great luck ordering through speechchips.com.
Stripboard Construction
I wanted this project to be build-able by anyone with a soldering iron and some motivation. So with that in mind, I decided not to use a custom printed circuit board (PCB) and go with an off the shelf solution.
Stripboards (or Veroboards) are a great way to build up permanent versions of your electronic designs. If you've never used one, the video below is a great primer.
The Video
Instead of writing a small novel on all the details of constructing this project, I thought it would be better to show you. The following video will show you in great detail the techniques required to build this project. It is also a good primer on Stripboard construction and electronics assembly in general.
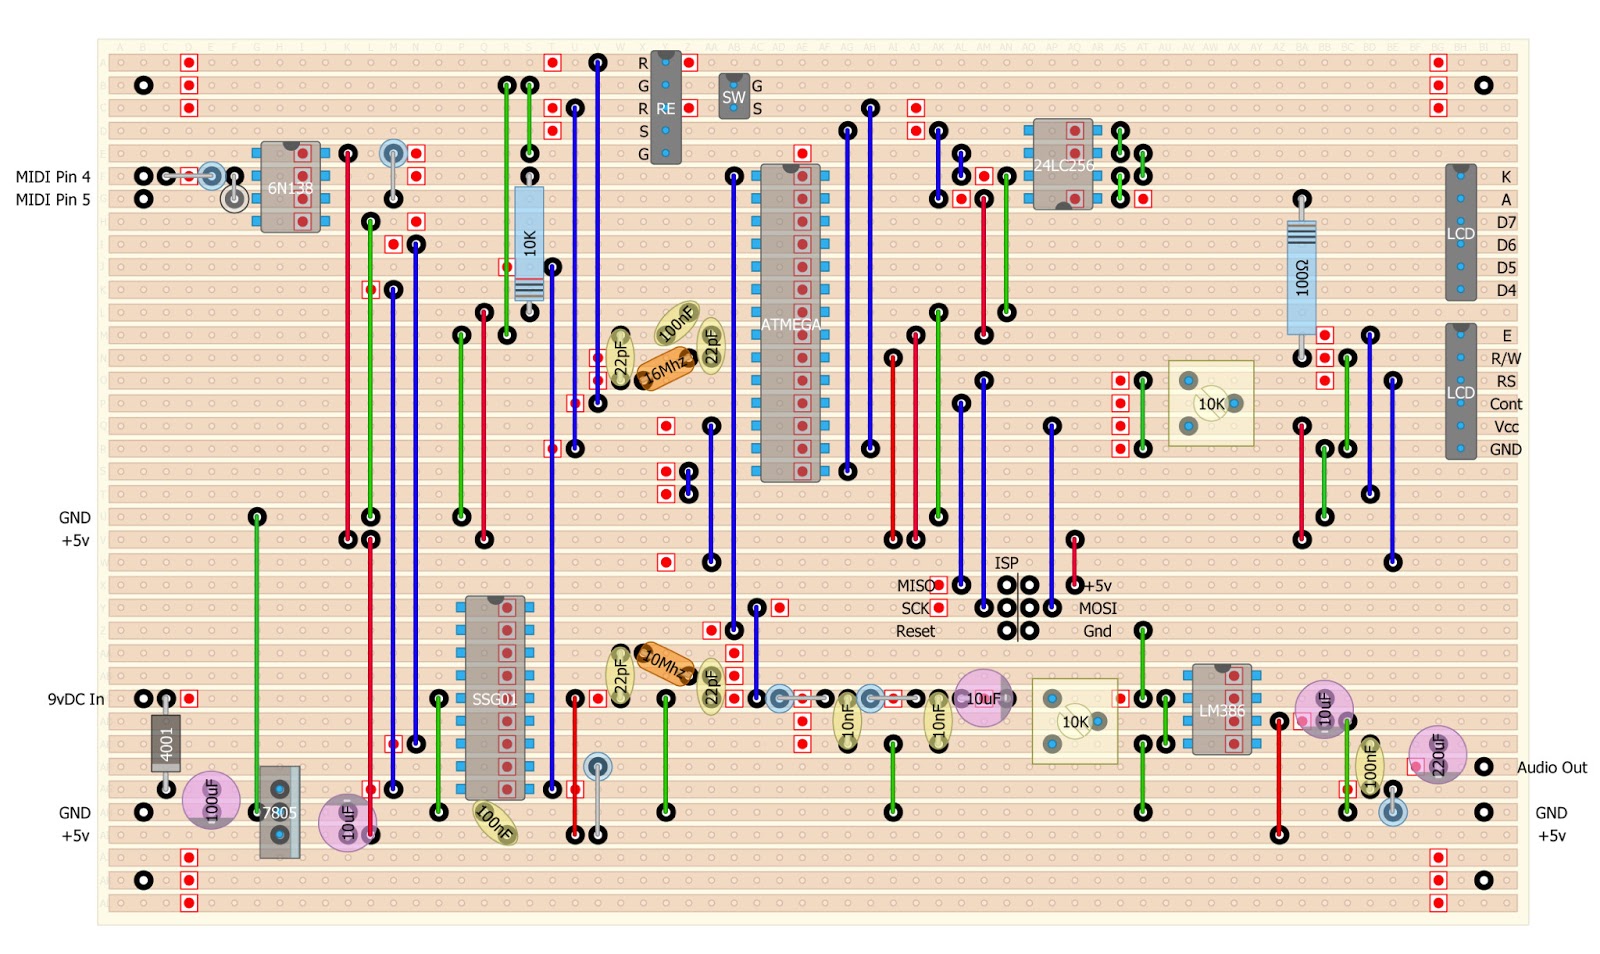
Schematic and Stripboard Diagram

The Code
Download the software for the NaV-1 HERE
Operation
After you have completed the project build, this video will show you how to put the NaV-1 to use.
Parts List
Integrated Circuits
1 - SSG01 Soundgin (or Babblebot) - Sound Processor Chip
1 - ATMEGA328P - Microcontroller
1 - 6N138 - Optocoupler
1 - 24LC256 - EEPROM
1 - LM386 - Audio Power Amplifier
1 - LM7805 - Voltage Regulator
1 - LCD Display 20x4 w/Backlight (HD44780 Compatible)
Semiconductors
1 - 1N4001 - Rectifier Diode
1 - 1N914 - Diode
1 - 16Mhz - Crystal
1 - 10Mhz - Crystal
Electrolytic Capacitors
1 - 220uF
1 - 100uF
3 - 10uF
Capacitors - Ceramic
3 - 100nF
2 - 10nF
4 - 22pF
Resistors - 1/4 Watt
2 - 27K Ohm
1 - 270 Ohm
1 - 220 Ohm
1 - 10K Ohm
1 - 1K Ohm
1 - 100 Ohm
1 - 10 Ohm
2 - 10K Ohm Trim Potentiometer
Hardware
1 - Rotary Encoder w/ Push Button - Panel Mount
1 - Push Button - Momentary, Normally Open - Panel Mount
1 - 5 Pin Din Socket (MIDI)
1 - 2.1mm Power Jack
1 - 1/4" Phone Jack (Mono)
2 - Header - 6 Position - .100" Straight (Mode Electronics #37-6206-3)
1 - Header - 5 Position - .100" Straight
1 - Header - 2 Position - .100" Straight
1 - Header - 2x6 Straight
2 - Connector - 6 Position w/Crimp Pins (Mode Electronics #37-606-3)
1 - Connector - 5 Position w/Crimp Pins
1 - Connector - 2 Position w/Crimp Pins
2 - DIP IC Socket - 8 Pin
1 - DIP IC Socket - 18 Pin
1 - DIP IC Socket - 28 Pin
1 - Stripboard - 38 x 62 Holes - 0.1"(2.54mm) Centers
1 - Ribbon Cable - (6 wires or more)
1 - Roll - AWG 22 Stranded Wire
3 - Roll - AWG 22 Solid Wire (Red, Green, Blue)
1 - 9v DC Power Adapter (500mA or Greater)